Valentine's Day Project for Kids


Welcome! My name is Mary. I help parents educate their children at home one day at a time. This site offers LEGO printablesfree music lessonsunit studies,  and much more. Use the tabs above to discover what Homegrown Learners has to offer. You will be equipped and encouraged to travel a most amazing path in your home!

Explore Science, Technology, Engineering, Math!


Search 


My Music Appreciation Curriculum


I'm Speaking for LEGO® Education!


Instagram

@marykprather

Popular Posts


Entries in science (33)

Sunday
Mar202011

Crab Science with Harry


So much of science is OBSERVATION, and that's just what we've been doing with our new pet!


Crab Science:


Scientific classification of hermit crabs:

Phylum: Arthropoda
Class: Crustacea
Order: Decapoda
Family: Coenobitidae
Genus: Birgus latro


We are beginning our study of hermit crabs, which was inspired by a two week study of seashells (which we just completed). I must say, the hermit crab is fascinating to watch!


In preparation for the arrival of Harry, we read a a great little book we found at the pet store (it's perfect for my nine year old to use a reference!), and talked to numerous people about their experiences with hermit crabs. We purchased a simple carrier (really only big enough for one crab) and what we would need to care for the crab. We also had a family meeting about WHO would be responsible for its care. (It's not going to be my husband and I, although I will be there for moral support!)

I think he has quite a nice crabitat.

Of course, we'll read the book A House for Hermit Crab by Eric Carle, and hopefully complete the lapbook that goes along with book, which can be found at Homeschool Share. The book has been a favorite of my six year old's for the past couple years, so it's like we're visiting an old friend.

*This post is linked to Science Sunday - click the button below to view other science activities!


Science Sunday

Photobucket


Sunday
Feb272011

School on Vacation? - Part II

Yesterday, I told you about some "school" we did while on vacation... a little beach time and some learning about shells. On a whim, we decided to go on an adventure after we left grandma and grandpa's house in SW Florida. Can you guess where we went?


(photo courtesy of the United States Air Force)

That's right! We went to see the last launch of the Space Shuttle Discovery. I wish I could tell you the picture above is from my camera, but alas, we could not get THAT close. We did, however, make it to Titusville, FL - otherwise known as the "Space Coast" - and joined the throng of 40,000 other space fans to see the launch.

We had studied space extensively back in the fall, so this was a great follow-up for us. The pilot of the shuttle, Captain Eric Boe, is also from Georgia (he is an alum of my husband's school system, and received his Master's degree from GA Tech).

Not only was it a great lesson about the space shuttle, but it was also an EXCELLENT lesson in patience - we waited in traffic several hours around Disney World and then again nearing the space coast, and we waited in our van THREE HOURS to get out of Titusville. We REALLY love each other now. Eeek. That's a long time in a van when you're not moving.

GMan and Miss B waiting for the shuttle to take off.

Our view - you can see Kennedy Space Center in the distance, and the launchpad is on the left.

This is the picture my husband snapped after take off - we didn't want to be behind a camera when it took off, and so many people had told us to enjoy the moment - we could see plenty of professional pictures of it anyway!


And, here are some weary travelers right after lift off. I love how you can still see the smoke trail in the background.


It was a most awesome experience for all of us - one I am sure we will all look back on and say "I remember when I went to see the space shuttle!". I think it qualified as a "school day" - what do you think?

*This post is linked to the Hip Homeschool Hop!

Hip Homeschool Hop Button

Photobucket

Sunday
Feb132011

Science Sunday - The Amazing Egg Experimnet

Science Sunday

It's time to link up with Adventures in Mommydom for Science Sunday. This week we did a very cool/gross/amazing science experiment that lasted all week but only took about 10 minutes of our time. I LOVE those experiments! It is called The Amazing Egg.

INGREDIENTS OR SUPPLIES:

1 uncooked egg in its shell
jar with a lid (old mayonnaise or peanut butter jar.. make sure the opening of the jar is as big as you can find... our egg expanded quite a bit and was hard to get out after the first three days!)
white vinegar
measuring tape

DIRECTIONS:

1. Wrap the measuring tape around the middle of the egg. Write down that measurement. (Our egg circumference was 6 inches)

2. Place the egg inside the jar. Make sure that it does not crack as you are putting it in.

3. Pour enough white vinegar over the egg to completely cover it. Screw the lid of the jar back on.

4. Leave the egg in the jar for three days. Every once in a while, look to see if it is changing and how.

5. After three days, carefully take the egg out of the jar. (We had to carefully SQUEEZE ours out) Measure around the middle of the egg again. (Ours was 7 inches this time and very rubbery with all of the shell completely gone!)

What happened?

When you put the egg in the vinegar, you see bubbles. After three days the shell of the egg is gone and the egg has gotten bigger.

Why? The eggshell is made of a substance similar to limestone. When the acid in the vinegar touches the shell, there is a chemical reaction. The shell breaks down during the reaction, creating gases including carbon dioxide, resulting in the bubbles that you see.

Vinegar has water in it. The water moves through very small holes in the egg’s membrane. This process is called osmosis. As more water goes inside the egg, it gets bigger. This is the same way that nutrients move into your body’s cells.

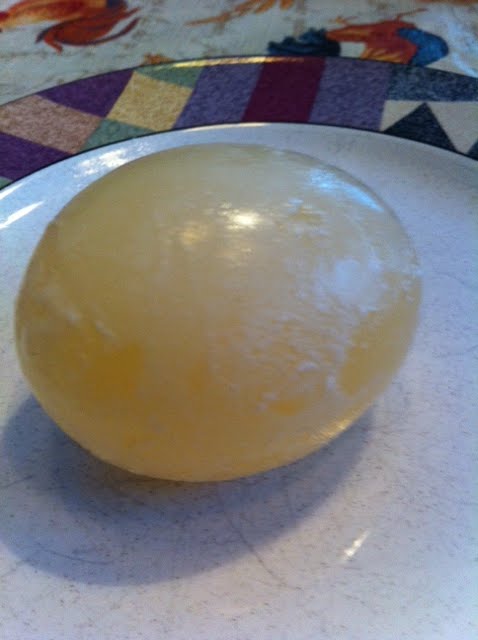
Here is what ours looked like!


Save this egg to use in The Amazing Egg Part II.

Part II:
INGREDIENTS OR SUPPLIES:

The Amazing Egg from the experiment entitled “The Amazing Egg Part I
Jar with a lid (old mayonnaise or peanut butter jar)
Corn syrup

DIRECTIONS:

1. Pour the corn syrup into the jar until it is at least three inches deep, but don’t fill the jar completely.

2. Gently place the egg in the jar and then screw on the lid.

3. Leave the egg in the jar for three days.

4. Check the egg every once in a while. What is happening... anything?

5. After the three days have passed, remove the egg from the jar very carefully. Measure around its middle.

What happened?

The egg shrinks and wrinkles up. It becomes small and rubbery.

Why? The water molecules inside the egg move through the egg’s membrane and into the corn syrup. The corn syrup does not move into the egg because its molecules are too big to fit through the tiny holes in the membrane. Particles move in and out of your body’s cells in this same way.

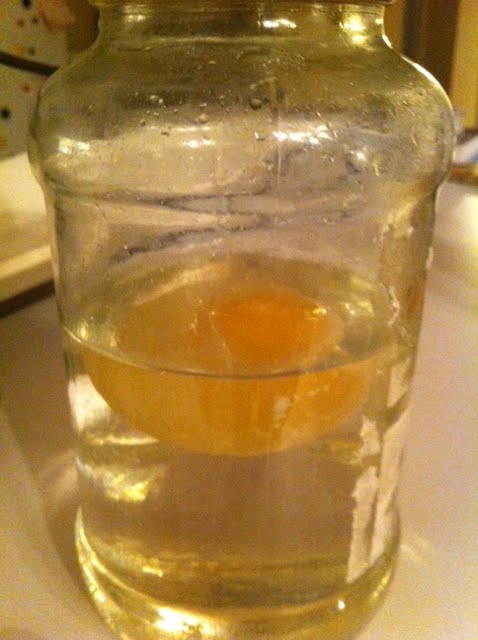
Here is our egg as of today (it still has 12 hours to go until we can take it out, but I can see that the egg has shrunk and you can REALLY see the yolk inside now.) It's been fascinating to watch this week.


**This experiment was taken directly from Easy FunSchool. There are a tons of simple, fun science experiments on this site.
Photobucket

Page 1 ... 6 7 8 9 10 ... 11 Next 3 Entries »